MountainZone.com Home
Get Schooled
Get Schooled
Homeroom


MountainZone.com Marketplace


© 2000 MountainZone.com.
All Rights Reserved
.


Intermediate Telemark
  • Tips for Telemark Beginners
  • Telemark Pole Plants Video

    Learning to ski can be an incredible experience. However, at certain points during the learning curve, some people hit plateaus where their ability to learn tends to slow or even stop. Lessons and practice can help get beyond this, so let's talk intermediate telemark.


    Click to zoom

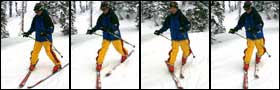
    Stability and speed control are of the utmost importance in order to increase the likelihood that you'll live another day. To accomplish both of these, we're going to show you some tricks to help you stay in control while linking up those tele turns.

    Take a look at the sequence of photos above. Stand in a wedge with your ski tips close together and your tails far apart. This creates a stable A-frame structure underneath you, making a foundation that will help you brake and control your speed.

    Now, you'll want to turn to avoid that tree that could cause you to eat through a straw. First we're going to work on steering and balance, then we will work on edging.

    Control Your Speed
    "A big wedge, like a piece of pie, helps you to slow down and stop..."
    Play with steering your feet into different size wedges to adjust speed and stop. When your skis are parallel (i.e., no wedge) you speed up. But a big wedge, like a piece of pie, helps you to slow down and stop. The goal of this simple exercise is to control your speed by alternating between making a big wedge and bringing your skis parallel to each other. If you need to stop, make a big wedge.

    You can also control your speed by steering. Slowly glide forward in small wedge, steering both feet across the hill. Keep going until you come to a stop (but keep your upper body facing down the fall line). Need to stop? Hey now you know two ways to control your speed: wedging and steering. If your skis cross, keep practicing.

    Three-Part Turn
    For simplicity's sake, let's divide the turn into three sections — top, middle and bottom. If you are standing at the beginning of your turn, with your skis pointed across the hill, this is the top. If you are standing with skis pointed down the hill, into the fall line, this is the middle of the turn. And when you are standing across the hill facing in the other direction, this is the bottom, or end of the turn.

    Also, get to know your inside and outside ski. As the skis go through a turn, like a half circle, they leave two tracks in the snow. The larger half circle is left by the outside ski and the smaller half circle is left by inside ski.

    "Once mastered on the groomed slopes apply it to short, medium and long radius turns. Then play with it in the crud, powder and bumps...."
    Up to this point, we've stayed in a wedge, equally weighted on both skis throughout the entire turn because it is a safe learning environment. Let's try starting in a wedge stance and finishing the turn in a telemark stance.

    Start in a wedge at the top of the turn. Guide the tip of your wedge into the fall line [see photo], steering both feet through the middle of the turn. Keep steering around, and as you approach the bottom of the turn, move your feet from a wedge stance into a parallel telemark stance [see photo].

    Continue playing with this and move from the wedge stance to the telemark stance earlier and earlier in your turn.

    Use Your Edges
    When the ski is rolled onto its side, this is called edging. To get a feel for edging, stand in a wedge stance and notice how both "big toe" inside edges are biting into the snow. Next, notice while standing in parallel telemark stance that the big toe of the leading foot is biting into the snow and the little toe of the trailing foot is biting into the snow [see photo].


    Big toe, little toe
    Let's put it into practice. Start the top of the turn once again in a wedge stance (equally weighted on both feet) and steer down the hill toward the middle of the next turn. While steering both skis into the fall line, start to move the inside (uphill) ski back during the middle of the turn.

    As you move the inside ski back, think about changing from its big-toe edge to the little-toe edge. Keep steering the skis across the fall line and finish at the bottom of the turn in a parallel telemark stance. This is called a Wedge-Christy turn.

    Turn Transitions
    Your ultimate goal is to eliminate the wedge part of the turn. When you switch from one turn to the next, it's called a turn transition. As you begin to link up your turns, think about finishing one turn then simultaneously:

  • point your hips down the fall line
  • switch out the leading ski
  • change from one set of big-toe/little-toe edges to the other set of big-toe/little-toe edges.

    Practice on easy groomed slopes to learn the movement. Then once you master it, apply it to short, medium and long radius turns. Then play with it in the crud, powder and bumps.

    Jimmy Ludlow, MountainZone.com Correspondent


  • [Telemark Pole Plants] [Get Schooled Homeroom]
    [Skiing Home] [MountainZone.com Home]